Nextcloud AIO Installation: Unterschied zwischen den Versionen
Die Seite wurde neu angelegt: „'''{{BASEPAGENAME}}''' - Beschreibung == Beschreibung == == Installation == <syntaxhighlight lang="bash" highlight="1" line copy> < /syntaxhighlight> <noinclude> == Anhang == === Siehe auch === <div style="column-count:2"> <categorytree hideroot=on mode="pages">{{BASEPAGENAME}}</categorytree> </div> ---- {{Special:PrefixIndex/{{BASEPAGENAME}}/}} === Dokumentation === <!-- ; Man-Page # [https://manpages.debian.org/stable/procps/pgrep.1.de.html prep…“ |
|||
| (17 dazwischenliegende Versionen von einem anderen Benutzer werden nicht angezeigt) | |||
| Zeile 1: | Zeile 1: | ||
'''{{BASEPAGENAME}}''' | '''{{BASEPAGENAME}}''' | ||
== Beschreibung == | == Beschreibung == | ||
== Installation == | == Installation == | ||
<syntaxhighlight lang="bash" highlight="1" line copy> | |||
< /syntaxhighlight> | |||
; Commands | |||
1. Installieren Sie Docker gemäß den Anweisungen unter [[Docker/Installation#Standard_Debian_Installation|Anweisungen]]. | |||
2. Um Nextcloud in Docker zu laden und zu starten, wird der folgende Befehl verwendet | |||
<syntaxhighlight lang="bash" copy line> | |||
sudo docker run --sig-proxy=false --name nextcloud-aio-mastercontainer --restart always --publish 80:80 --publish 8080:8080 --publish 8443:8443 --volume nextcloud_aio_mastercontainer:/mnt/docker-aio-config | |||
</syntaxhighlight> | |||
Next, you can open the AIO interface on https://localhost:8080 or https://the.servers.ip.address:8080. | |||
; Why you should use an ip-address | |||
:* It’s important to always use an ip-address if you access this port, and not a domain. Otherwise, you risk that HSTS might block access to it later! | |||
<br><br> | |||
3. You need to accept the self-signed certificate. Then you should see this: | |||
[[Datei:Aiosetup0.webp|600px|zentriert]] | |||
* Alternatively, if ports 80 and 8443 should be opened in your firewall/router and a domain is configured to point to your server, you can reach the AIO interface with a valid certificate using https://your-domain.com:8443. | |||
4. Click on “Open Nextcloud AIO login” and paste your password: | |||
[[Datei:Aiosetup1.webp|600px|zentriert]] | |||
5. Then, you should see the AIO interface: | |||
[[Datei:Aiosetup2.webp|600px|zentriert]] | |||
6. Next, type in your public domain that you you’ve got before doing this guide. The interface should help you figure out the exact steps. (Set up DDNS for your domain to point to your public IP, port-forward at least ports 443/tcp, 3478/udp, and 3478/tcp to your Linux machine.) | |||
7. After you’ve set it up correctly, it should allow you to pass to the next step, where you can configure the wanted optional add-ons and the timezone, and click on “Start containers” to download and start them. | |||
[[Datei:Aiosetup3.webp|600px|zentriert]] | |||
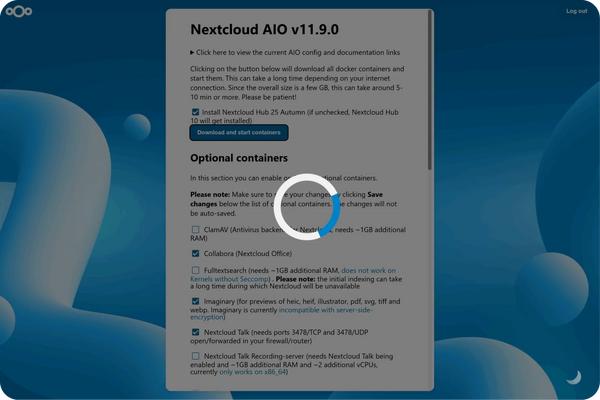
8. At this point, you should see a spinner that will take a while depending on your internet speed. It should take around 10 minutes or more. | |||
[[Datei:Aiosetup4.webp|600px|zentriert]] | |||
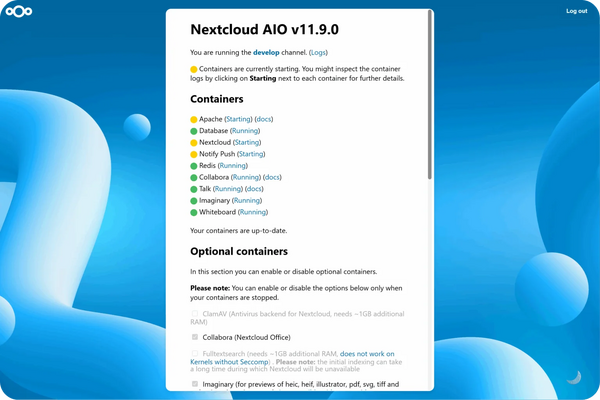
9. When all containers are downloaded and started, you will see this screen showing the containers still starting, which will do the first installation for you: | |||
[[Datei:Aiosetup5.webp|600px|zentriert]] | |||
10. When everything is done, you should see this screen: | |||
[[Datei:Aiosetup6.webp|600px|zentriert]] | |||
11. Finally, you can now open your new Nextcloud instance and log in with the given admin credentials. | |||
12. That’s it! Everything is set and ready for production. | |||
== Backups == | |||
Backups werden mit der integrierten Backup-Funktion Nextcloud AIO auf Basis von BorgBackup erstellt. | |||
* Um die Backups zu konfigurieren, müssen Sie einen Ordner für Backups erstellen, z. B. ''/mnt/backup'' | |||
<syntaxhighlight lang="bash" highlight="1" copy line> | |||
sudo mkdir -p /mnt/backup | |||
</syntaxhighlight> | |||
* Anschließend müssen Sie sich als Admin anmelden und den Pfad Settings > Overview > ''Open Nextcloud AIO Interface'' durchlaufen. | |||
* Auf dieser Seite finden Sie den Abschnitt ''Backup and restore''. | |||
* Hier können Sie das Verzeichnis für die Sicherung angeben und den Remote-Server für Backups festlegen. | |||
* Geben Sie im Feld ''Local backup directory'' ''/mnt/backup'' ein und klicken Sie auf ''Submit''. AIO erstellt selbstständig ein Borg-Repository unter dem Pfad ''/mnt/backup/borg''. | |||
*Das System erstellt automatisch ein 48-stelliges Passwort zur Verschlüsselung der Sicherung. | |||
<pre> | |||
Backup information | |||
This is your encryption password for backups: df38*** | |||
Please save this password in a safe place. You won't be able to restore from backup if you lose this password! | |||
All important data from your Nextcloud AIO instance such as the database, your files and the mastercontainer's configuration files, will be backed up. | |||
The backup uses a tool called BorgBackup, a well-known server backup tool that efficiently backs up your files and encrypts them on the fly. | |||
By using this tool, backups are incremental, differential, compressed and encrypted – so only the first backup will take a while. Further backups should be fast as only changes are taken into account. | |||
Backups will be created in the following directory on the host: /mnt/backup/borg | |||
Be aware that this solution does not backup files and folders that are mounted into Nextcloud using the external storage app, but you can add further Docker volumes and host paths that you want to back up after the initial backup is done. | |||
For information about backup retention, see this. | |||
Daily backups can be enabled after the initial backup is done. Enabling this also allows you to enable an option to update all containers, Nextcloud, and its apps automatically. | |||
For further documentation and options on this backup solution refer to this section and below. | |||
</pre> | |||
* Jetzt ist in der AIO-Benutzeroberfläche die Schaltfläche ''Create backup'' (Sicherung erstellen) verfügbar. Außerdem kann der Speicherort der Sicherungen über die Schaltfläche ''Reset backup location'' (Speicherort der Sicherung zurücksetzen) geändert werden. | |||
== fail2ban nextcloud install == | |||
0. Installieren Sie das Paket fail2ban. | |||
<syntaxhighlight lang="bash" highlight="1" copy line> | |||
sudo apt install fail2ban | |||
</syntaxhighlight> | |||
1. Erstellen Sie die Datei ''/etc/fail2ban/filter.d/nextcloud.conf'': | |||
<syntaxhighlight lang="ini" copy line> | |||
[Definition] | |||
_groupsre = (?:(?:,?\s*"\w+":(?:"[^"]+"|\w+))*) | |||
failregex = ^\{%(_groupsre)s,?\s*"remoteAddr":"<HOST>"%(_groupsre)s,?\s*"message":"Login failed: | |||
^\{%(_groupsre)s,?\s*"remoteAddr":"<HOST>"%(_groupsre)s,?\s*"message":"Trusted domain error. | |||
datepattern = ,?\s*"time"\s*:\s*"%%Y-%%m-%%d[T ]%%H:%%M:%%S(%%z)?" | |||
</syntaxhighlight> | |||
2. Erstellen Sie die Datei ''/etc/fail2ban/jail.d/nextcloud.local'': | |||
<syntaxhighlight lang="ini" copy line> | |||
[nextcloud] | |||
backend = auto | |||
enabled = true | |||
port = 80,443 | |||
protocol = tcp | |||
filter = nextcloud | |||
maxretry = 2 | |||
bantime = 3m | |||
findtime = 5m | |||
logpath = /var/lib/docker/volumes/nextcloud_aio_nextcloud/_data/data/nextcloud.log | |||
chain=DOCKER-USER | |||
action = iptables-multiport[name=nextcloud, port="80,443", chain="DOCKER-USER"] | |||
</syntaxhighlight> | |||
3. Fail2ban neu starten | |||
<syntaxhighlight lang="bash" highlight="1" copy line> | |||
sudo systemctl restart fail2ban | |||
</syntaxhighlight> | |||
| Zeile 31: | Zeile 160: | ||
==== Weblinks ==== | ==== Weblinks ==== | ||
[[Kategorie: | [[Kategorie:Nextcloud]] | ||
[[Kategorie:Docker]] | |||
</noinclude> | </noinclude> | ||
Aktuelle Version vom 2. November 2025, 19:25 Uhr
Nextcloud AIO Installation
Beschreibung
Installation
- Commands
1. Installieren Sie Docker gemäß den Anweisungen unter Anweisungen.
2. Um Nextcloud in Docker zu laden und zu starten, wird der folgende Befehl verwendet
sudo docker run --sig-proxy=false --name nextcloud-aio-mastercontainer --restart always --publish 80:80 --publish 8080:8080 --publish 8443:8443 --volume nextcloud_aio_mastercontainer:/mnt/docker-aio-config
Next, you can open the AIO interface on https://localhost:8080 or https://the.servers.ip.address:8080.
- Why you should use an ip-address
-
- It’s important to always use an ip-address if you access this port, and not a domain. Otherwise, you risk that HSTS might block access to it later!
3. You need to accept the self-signed certificate. Then you should see this:
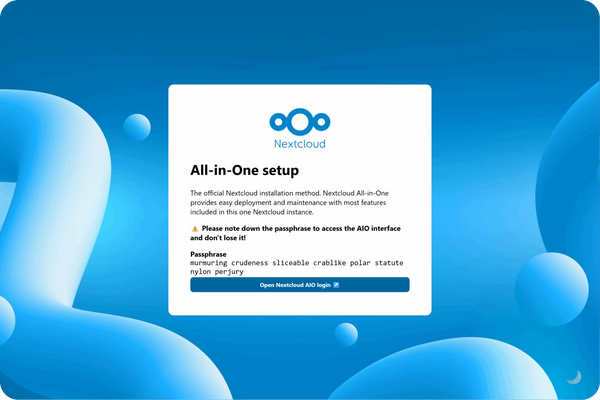
- Alternatively, if ports 80 and 8443 should be opened in your firewall/router and a domain is configured to point to your server, you can reach the AIO interface with a valid certificate using https://your-domain.com:8443.
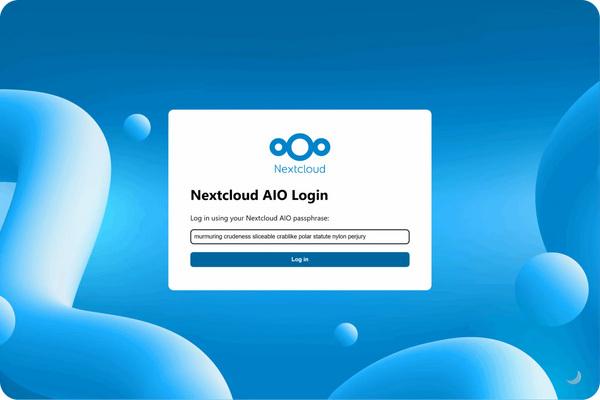
4. Click on “Open Nextcloud AIO login” and paste your password:
5. Then, you should see the AIO interface:
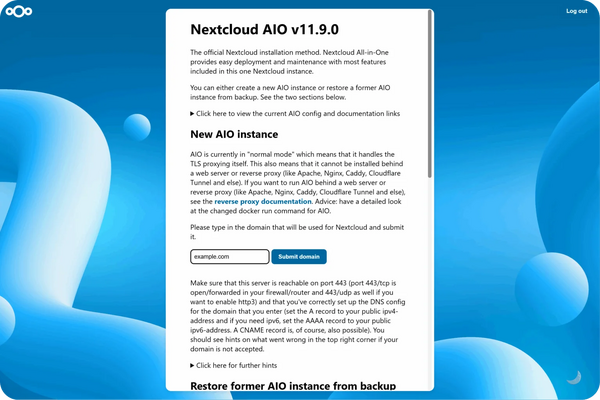
6. Next, type in your public domain that you you’ve got before doing this guide. The interface should help you figure out the exact steps. (Set up DDNS for your domain to point to your public IP, port-forward at least ports 443/tcp, 3478/udp, and 3478/tcp to your Linux machine.)
7. After you’ve set it up correctly, it should allow you to pass to the next step, where you can configure the wanted optional add-ons and the timezone, and click on “Start containers” to download and start them.
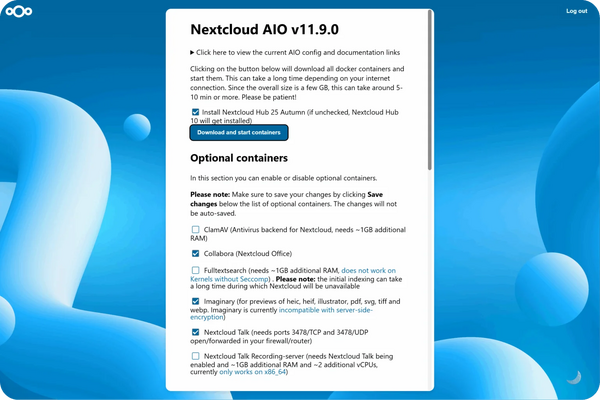
8. At this point, you should see a spinner that will take a while depending on your internet speed. It should take around 10 minutes or more.
9. When all containers are downloaded and started, you will see this screen showing the containers still starting, which will do the first installation for you:
10. When everything is done, you should see this screen:
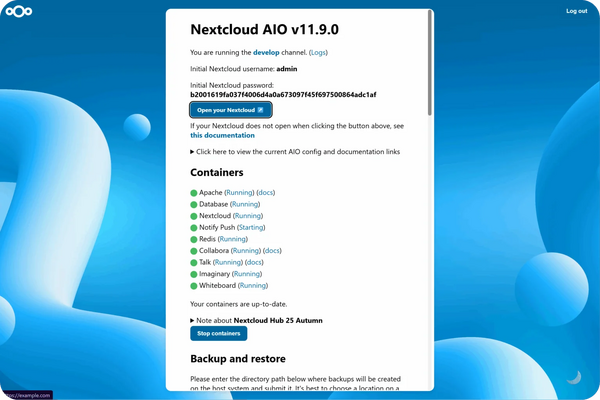
11. Finally, you can now open your new Nextcloud instance and log in with the given admin credentials.
12. That’s it! Everything is set and ready for production.
Backups
Backups werden mit der integrierten Backup-Funktion Nextcloud AIO auf Basis von BorgBackup erstellt.
- Um die Backups zu konfigurieren, müssen Sie einen Ordner für Backups erstellen, z. B. /mnt/backup
sudo mkdir -p /mnt/backup
- Anschließend müssen Sie sich als Admin anmelden und den Pfad Settings > Overview > Open Nextcloud AIO Interface durchlaufen.
- Auf dieser Seite finden Sie den Abschnitt Backup and restore.
- Hier können Sie das Verzeichnis für die Sicherung angeben und den Remote-Server für Backups festlegen.
- Geben Sie im Feld Local backup directory /mnt/backup ein und klicken Sie auf Submit. AIO erstellt selbstständig ein Borg-Repository unter dem Pfad /mnt/backup/borg.
- Das System erstellt automatisch ein 48-stelliges Passwort zur Verschlüsselung der Sicherung.
Backup information
This is your encryption password for backups: df38***

Please save this password in a safe place. You won't be able to restore from backup if you lose this password!

All important data from your Nextcloud AIO instance such as the database, your files and the mastercontainer's configuration files, will be backed up.

The backup uses a tool called BorgBackup, a well-known server backup tool that efficiently backs up your files and encrypts them on the fly.

By using this tool, backups are incremental, differential, compressed and encrypted – so only the first backup will take a while. Further backups should be fast as only changes are taken into account.

Backups will be created in the following directory on the host: /mnt/backup/borg

Be aware that this solution does not backup files and folders that are mounted into Nextcloud using the external storage app, but you can add further Docker volumes and host paths that you want to back up after the initial backup is done.

For information about backup retention, see this.

Daily backups can be enabled after the initial backup is done. Enabling this also allows you to enable an option to update all containers, Nextcloud, and its apps automatically.

For further documentation and options on this backup solution refer to this section and below.
- Jetzt ist in der AIO-Benutzeroberfläche die Schaltfläche Create backup (Sicherung erstellen) verfügbar. Außerdem kann der Speicherort der Sicherungen über die Schaltfläche Reset backup location (Speicherort der Sicherung zurücksetzen) geändert werden.
fail2ban nextcloud install
0. Installieren Sie das Paket fail2ban.
sudo apt install fail2ban
1. Erstellen Sie die Datei /etc/fail2ban/filter.d/nextcloud.conf:
[Definition]
_groupsre = (?:(?:,?\s*"\w+":(?:"[^"]+"|\w+))*)
failregex = ^\{%(_groupsre)s,?\s*"remoteAddr":"<HOST>"%(_groupsre)s,?\s*"message":"Login failed:
            ^\{%(_groupsre)s,?\s*"remoteAddr":"<HOST>"%(_groupsre)s,?\s*"message":"Trusted domain error.
datepattern = ,?\s*"time"\s*:\s*"%%Y-%%m-%%d[T ]%%H:%%M:%%S(%%z)?"
2. Erstellen Sie die Datei /etc/fail2ban/jail.d/nextcloud.local:
[nextcloud]
backend = auto
enabled = true
port = 80,443
protocol = tcp
filter = nextcloud
maxretry = 2
bantime = 3m
findtime = 5m
logpath = /var/lib/docker/volumes/nextcloud_aio_nextcloud/_data/data/nextcloud.log
chain=DOCKER-USER
action = iptables-multiport[name=nextcloud, port="80,443", chain="DOCKER-USER"]
3. Fail2ban neu starten
sudo systemctl restart fail2ban
Anhang
Siehe auch
Dokumentation
Links
Projekt
Weblinks