Typo3/Backend: Unterschied zwischen den Versionen
Erscheinungsbild
| (34 dazwischenliegende Versionen von 2 Benutzern werden nicht angezeigt) | |||
| Zeile 1: | Zeile 1: | ||
'''Typo3/Backend''' - | |||
= | == Beschreibung == | ||
; Was ist das Backend? | |||
[[Datei:Schermata 2021-02-24 alle 18.13.32.png|mini|500px|Backend]] | |||
* Das Backend ist der Teil von Typo3, in dem alle Teile der Website verwaltet werden können. | |||
* Um in das Backend der Website zu gelangen, melden Sie sich einfach bei Typo3 an. | |||
<br clear=all> | |||
[[Datei:Schermata 2021-02- | |||
= | ; Backend-Struktur | ||
[[Datei:Schermata 2021-02-23 alle 09.39.28.png|mini|500px|Backend-Struktur]] | |||
Die Backend-Struktur besteht aus 5 Hauptteilen: | |||
# [[#Top-Leiste|Top-Leiste]]: Hier finden Sie die Benutzereinstellungen, die Abmeldung, die Suche und weitere Funktionen. | |||
[[Datei:Schermata 2021-02-23 alle 09.44.13.png|mini| | # [[#Modul-Menü]]: Hier sehen Sie alle Funktionen und Module, die Sie zum Gestalten und Einrichten der Website benötigen. | ||
== | # [[#Seitenbaum]]: Hier können Sie die Struktur und die Seiten der Website organisieren und diejenige auswählen, die konfiguriert werden muss. | ||
# [[#Inhaltsbereich]]: In diesem Bereich können Sie den Inhalt der Seiten konfigurieren und ändern. | |||
[[Datei:Schermata 2021-02-23 alle 09.46.25.png|smallpx|mini| | # [[#Docheader]]: Der Docheader enthält kontextbezogene Symbole, darunter „Schließen”, „Speichern” und „Vorschau”. Außerdem enthält er weitere Informationen und ein Dropdown-Menü mit weiteren Aktionen, die je nach den von Ihnen ausgeführten Aktionen angezeigt werden. | ||
== | |||
== Top-Leiste == | |||
[[Datei:Schermata 2021-02-23 alle 10.09.14.png|1200px|none|Obere Leiste]] | |||
[[Datei:Schermata 2021-02-23 alle 09.52.49.png|mini| | # Links befindet sich das Symbol zum Minimieren des Modulmenüs. | ||
* | # Dieses Symbol dient zum Ausblenden der Seitenstruktur. | ||
* | # Das nächste Symbol ist das TYPO3 CMS-Logo (das möglicherweise durch eine Erweiterung geändert wurde). Darunter befindet sich der Name Ihrer Website. | ||
= | # Das Sternsymbol öffnet eine Liste mit Lesezeichen. Wenn Sie dieses Symbol im TYPO3-Backend sehen, können Sie darauf klicken, um die aktuelle Ansicht in dieser Liste mit Lesezeichen zu speichern. | ||
# Das Blitzsymbol öffnet das Menü „Cache leeren“, um die verschiedenen Caches zu leeren, die vom TYPO3 CMS zur Leistungsverbesserung verwendet werden. | |||
[[Datei:Schermata 2021-02-23 alle 10.03.53.png|mini| | # Das Fragezeichen-Symbol öffnet das Hilfemenü, über das Sie auf Hilfsmodule und zusätzliche Support-Dokumentation zugreifen können. | ||
* | # Das nächste Symbol öffnet ein Fenster mit verschiedenen Informationen zur Umgebung. | ||
# Ihr Benutzername wird als Nächstes angezeigt. | |||
[[ | |||
Es öffnet sich ein Menü, über das Sie auf das Modul „Benutzereinstellungen“ zugreifen können, in dem Sie Ihr Passwort ändern und andere Backend-Einstellungen konfigurieren können. Über diese Menüoption können Sie sich auch aus dem CMS „abmelden“. | |||
# Ganz rechts befindet sich das allgemeine Suchfeld, mit dem Sie alle Datensätze (Seiten, Inhaltselemente, Benutzer usw.) durchsuchen können, die in Ihrer TYPO3-Installation vorhanden sind. | |||
== Seitenbaum == | |||
[[Datei:Schermata 2021-02-23 alle 09.44.13.png|mini|300px|Seitenbaumstruktur]] | |||
* Der Seitenbaum stellt die hierarchische Struktur Ihrer Website und ihrer Seiten dar. | |||
* In den meisten Fällen entspricht dies genau der Navigationsstruktur Ihrer Website. | |||
* Der Seitenbaum kann durch Klicken auf den Pfeil links neben jeder Seite erweitert werden. | |||
<br clear=all> | |||
== Seite im Frontend anzeigen == | |||
[[Datei:Schermata 2021-02-23 alle 09.46.25.png|smallpx|mini|300px|Klicken Sie auf diese Schaltfläche, um das Frontend anzuzeigen]] | |||
Um die Seite im Frontend anzuzeigen, klicken Sie im Docheader auf das Symbol „Webseite anzeigen“. | |||
<br clear=all> | |||
== Neue Seiten erstellen == | |||
; Drag & Drop | |||
[[Datei:Schermata 2021-02-23 alle 09.52.49.png|mini|300px|So erstellen Sie eine neue Seite]] | |||
# Klicken Sie auf das Symbol „Neue Seiten erstellen” (oben links in der Seitenstruktur). | |||
# Ziehen Sie eine „Standard”-Seite per Drag & Drop an die gewünschte Stelle im Seitenbaum | |||
'''Achtung''' | |||
<blockquote> | |||
* Denken Sie daran, dass der Seitenbaum die Struktur der Website widerspiegelt, achten Sie also darauf, wo Sie die neue Seite ablegen. | |||
* Wenn Sie die Seite auf einer bereits vorhandenen Seite ablegen, wird eine Unterseite erstellt | |||
</blockquote> | |||
<br clear=all> | |||
== Inhaltsbereich == | |||
; Inhalte einfügen | |||
[[Datei:Schermata 2021-02-23 alle 10.03.53.png|mini|600px|Dies ist der Bereich, in dem Sie die verschiedenen Inhalte einfügen und organisieren können]] | |||
Seitenbereich beachten | |||
; Siehe auch | |||
* [[Inhaltselemente einfügen|Inhaltselemente]] | |||
* [[Backend-Layout]] | |||
[[Kategorie:Typo3]] | |||
Aktuelle Version vom 31. Juli 2025, 21:04 Uhr
Typo3/Backend -
Beschreibung
- Was ist das Backend?
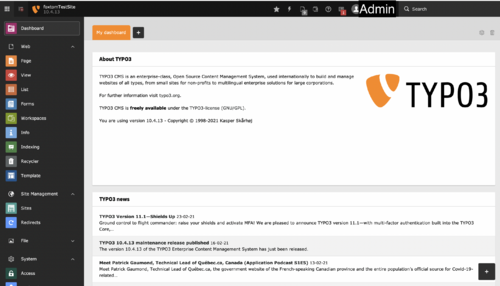
- Das Backend ist der Teil von Typo3, in dem alle Teile der Website verwaltet werden können.
- Um in das Backend der Website zu gelangen, melden Sie sich einfach bei Typo3 an.
- Backend-Struktur
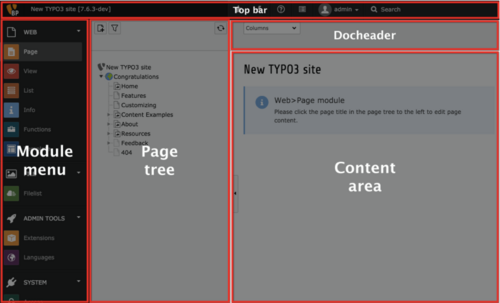
Die Backend-Struktur besteht aus 5 Hauptteilen:
- Top-Leiste: Hier finden Sie die Benutzereinstellungen, die Abmeldung, die Suche und weitere Funktionen.
- #Modul-Menü: Hier sehen Sie alle Funktionen und Module, die Sie zum Gestalten und Einrichten der Website benötigen.
- #Seitenbaum: Hier können Sie die Struktur und die Seiten der Website organisieren und diejenige auswählen, die konfiguriert werden muss.
- #Inhaltsbereich: In diesem Bereich können Sie den Inhalt der Seiten konfigurieren und ändern.
- #Docheader: Der Docheader enthält kontextbezogene Symbole, darunter „Schließen”, „Speichern” und „Vorschau”. Außerdem enthält er weitere Informationen und ein Dropdown-Menü mit weiteren Aktionen, die je nach den von Ihnen ausgeführten Aktionen angezeigt werden.
Top-Leiste

- Links befindet sich das Symbol zum Minimieren des Modulmenüs.
- Dieses Symbol dient zum Ausblenden der Seitenstruktur.
- Das nächste Symbol ist das TYPO3 CMS-Logo (das möglicherweise durch eine Erweiterung geändert wurde). Darunter befindet sich der Name Ihrer Website.
- Das Sternsymbol öffnet eine Liste mit Lesezeichen. Wenn Sie dieses Symbol im TYPO3-Backend sehen, können Sie darauf klicken, um die aktuelle Ansicht in dieser Liste mit Lesezeichen zu speichern.
- Das Blitzsymbol öffnet das Menü „Cache leeren“, um die verschiedenen Caches zu leeren, die vom TYPO3 CMS zur Leistungsverbesserung verwendet werden.
- Das Fragezeichen-Symbol öffnet das Hilfemenü, über das Sie auf Hilfsmodule und zusätzliche Support-Dokumentation zugreifen können.
- Das nächste Symbol öffnet ein Fenster mit verschiedenen Informationen zur Umgebung.
- Ihr Benutzername wird als Nächstes angezeigt.
Es öffnet sich ein Menü, über das Sie auf das Modul „Benutzereinstellungen“ zugreifen können, in dem Sie Ihr Passwort ändern und andere Backend-Einstellungen konfigurieren können. Über diese Menüoption können Sie sich auch aus dem CMS „abmelden“.
- Ganz rechts befindet sich das allgemeine Suchfeld, mit dem Sie alle Datensätze (Seiten, Inhaltselemente, Benutzer usw.) durchsuchen können, die in Ihrer TYPO3-Installation vorhanden sind.
Seitenbaum
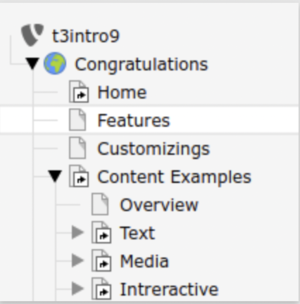
- Der Seitenbaum stellt die hierarchische Struktur Ihrer Website und ihrer Seiten dar.
- In den meisten Fällen entspricht dies genau der Navigationsstruktur Ihrer Website.
- Der Seitenbaum kann durch Klicken auf den Pfeil links neben jeder Seite erweitert werden.
Seite im Frontend anzeigen
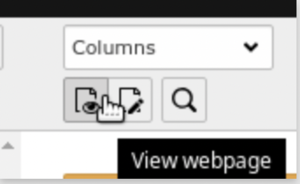
Um die Seite im Frontend anzuzeigen, klicken Sie im Docheader auf das Symbol „Webseite anzeigen“.
Neue Seiten erstellen
- Drag & Drop
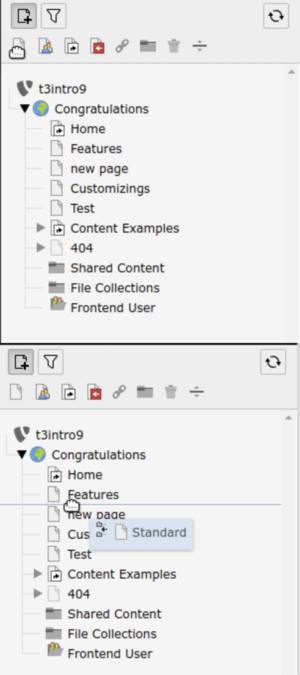
- Klicken Sie auf das Symbol „Neue Seiten erstellen” (oben links in der Seitenstruktur).
- Ziehen Sie eine „Standard”-Seite per Drag & Drop an die gewünschte Stelle im Seitenbaum
Achtung
- Denken Sie daran, dass der Seitenbaum die Struktur der Website widerspiegelt, achten Sie also darauf, wo Sie die neue Seite ablegen.
- Wenn Sie die Seite auf einer bereits vorhandenen Seite ablegen, wird eine Unterseite erstellt
Inhaltsbereich
- Inhalte einfügen
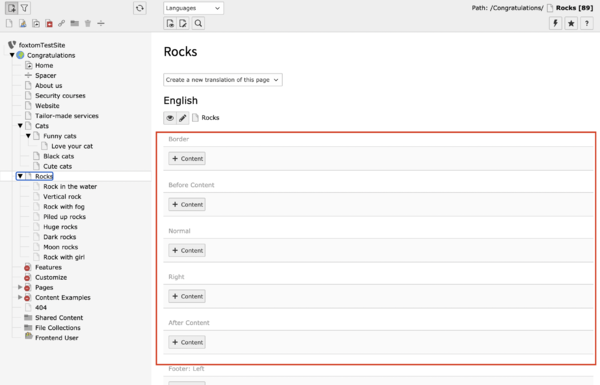
Seitenbereich beachten
- Siehe auch