WireGuard UI: Unterschied zwischen den Versionen
Keine Bearbeitungszusammenfassung |
|||
| (2 dazwischenliegende Versionen desselben Benutzers werden nicht angezeigt) | |||
| Zeile 1: | Zeile 1: | ||
[[Kategorie:WireGuard]] | [[Kategorie:WireGuard]] | ||
= wireguard-ui = | |||
A web user interface to manage your WireGuard setup. | |||
== Features == | |||
* Friendly UI | |||
* Authentication | |||
* Manage extra client's information (name, email, etc) | |||
* Retrieve configs using QR code / file | |||
== Run WireGuard-UI == | |||
Default username and password are <tt>admin</tt>. | |||
=== Using binary file === | |||
Download the binary file from the release and run it with command: | |||
./wireguard-ui | |||
=== Using docker compose === | |||
You can take a look at this example of [https://github.com/ngoduykhanh/wireguard-ui/blob/master/docker-compose.yaml docker-compose.yml]. Please adjust volume mount points to work with your setup. Then run it like below: | |||
docker-compose up | |||
Note:* There is a Status option that needs docker to be able to access the network of the host in order to read the wireguard interface stats. See the <tt>cap_add</tt> and <tt>network_mode</tt> options on the docker-compose.yaml | |||
* Because the <tt>network_mode</tt> is set to <tt>host</tt>, we don't need to specify the exposed ports. The app will listen on port <tt>5000</tt> by default. | |||
== Environment Variables == | |||
{| style="border-spacing:0;width:17cm;" | |||
|- style="border:none;padding:0.049cm;" | |||
! align=center| Variable | |||
! align=center| Description | |||
|- style="border:none;padding:0.049cm;" | |||
|| <tt>SESSION_SECRET</tt> | |||
|| Used to encrypt the session cookies. Set this to a random value. | |||
|- style="border:none;padding:0.049cm;" | |||
|| <tt>WGUI_USERNAME</tt> | |||
|| The username for the login page. (default <tt>admin</tt>) | |||
|- style="border:none;padding:0.049cm;" | |||
|| <tt>WGUI_PASSWORD</tt> | |||
|| The password for the user on the login page. Will be hashed automatically. (default <tt>admin</tt>) | |||
|- style="border:none;padding:0.049cm;" | |||
|| <tt>WGUI_PASSWORD_HASH</tt> | |||
|| The password hash for the user on the login page. (alternative to <tt>WGUI_PASSWORD</tt>) | |||
|- style="border:none;padding:0.049cm;" | |||
|| <tt>WGUI_ENDPOINT_ADDRESS</tt> | |||
|| The default endpoint address used in global settings. (default is your public IP address) | |||
|- style="border:none;padding:0.049cm;" | |||
|| <tt>WGUI_DNS</tt> | |||
|| The default DNS servers (comma-separated-list) used in the global settings. (default <tt>1.1.1.1</tt>) | |||
|- style="border:none;padding:0.049cm;" | |||
|| <tt>WGUI_MTU</tt> | |||
|| The default MTU used in global settings. (default <tt>1450</tt>) | |||
|- style="border:none;padding:0.049cm;" | |||
|| <tt>WGUI_PERSISTENT_KEEPALIVE</tt> | |||
|| The default persistent keepalive for WireGuard in global settings. (default <tt>15</tt>) | |||
|- style="border:none;padding:0.049cm;" | |||
|| <tt>WGUI_FORWARD_MARK</tt> | |||
|| The default WireGuard forward mark. (default <tt>0xca6c</tt>) | |||
|- style="border:none;padding:0.049cm;" | |||
|| <tt>WGUI_CONFIG_FILE_PATH</tt> | |||
|| The default WireGuard config file path used in global settings. (default <tt>/etc/wireguard/wg0.conf</tt>) | |||
|- style="border:none;padding:0.049cm;" | |||
|| <tt>BASE_PATH</tt> | |||
|| Set this variable if you run wireguard-ui under a subpath of your reverse proxy virtual host (e.g. /wireguard)) | |||
|- | |||
|} | |||
=== Defaults for server configuration === | |||
These environment variables are used to control the default server settings used when initializing the database. | |||
{| style="border-spacing:0;width:17cm;" | |||
|- style="border:none;padding:0.049cm;" | |||
! align=center| Variable | |||
! align=center| Description | |||
|- style="border:none;padding:0.049cm;" | |||
|| <tt>WGUI_SERVER_INTERFACE_ADDRESSES</tt> | |||
|| The default interface addresses (comma-separated-list) for the WireGuard server configuration. (default <tt>10.252.1.0/24</tt>) | |||
|- style="border:none;padding:0.049cm;" | |||
|| <tt>WGUI_SERVER_LISTEN_PORT</tt> | |||
|| The default server listen port. (default <tt>51820</tt>) | |||
|- style="border:none;padding:0.049cm;" | |||
|| <tt>WGUI_SERVER_POST_UP_SCRIPT</tt> | |||
|| The default server post-up script. | |||
|- style="border:none;padding:0.049cm;" | |||
|| <tt>WGUI_SERVER_POST_DOWN_SCRIPT</tt> | |||
|| The default server post-down script. | |||
|- | |||
|} | |||
=== Defaults for new clients === | |||
These environment variables are used to set the defaults used in <tt>New Client</tt> dialog. | |||
{| style="border-spacing:0;width:17cm;" | |||
|- style="border:none;padding:0.049cm;" | |||
! align=center| Variable | |||
! align=center| Description | |||
|- style="border:none;padding:0.049cm;" | |||
|| <tt>WGUI_DEFAULT_CLIENT_ALLOWED_IPS</tt> | |||
|| Comma-separated-list of CIDRs for the <tt>Allowed IPs</tt> field. (default <tt>0.0.0.0/0</tt>) | |||
|- style="border:none;padding:0.049cm;" | |||
|| <tt>WGUI_DEFAULT_CLIENT_EXTRA_ALLOWED_IPS</tt> | |||
|| Comma-separated-list of CIDRs for the <tt>Extra Allowed IPs</tt> field. (default empty) | |||
|- style="border:none;padding:0.049cm;" | |||
|| <tt>WGUI_DEFAULT_CLIENT_USE_SERVER_DNS</tt> | |||
|| Boolean value [<tt>0</tt>, <tt>f</tt>, <tt>F</tt>, <tt>false</tt>, <tt>False</tt>, <tt>FALSE</tt>, <tt>1</tt>, <tt>t</tt>, <tt>T</tt>, <tt>true</tt>, <tt>True</tt>, <tt>TRUE</tt>] (default <tt>true</tt>) | |||
|- style="border:none;padding:0.049cm;" | |||
|| <tt>WGUI_DEFAULT_CLIENT_ENABLE_AFTER_CREATION</tt> | |||
|| Boolean value [<tt>0</tt>, <tt>f</tt>, <tt>F</tt>, <tt>false</tt>, <tt>False</tt>, <tt>FALSE</tt>, <tt>1</tt>, <tt>t</tt>, <tt>T</tt>, <tt>true</tt>, <tt>True</tt>, <tt>TRUE</tt>] (default <tt>true</tt>) | |||
|- | |||
|} | |||
=== Email configuration === | |||
To use custom <tt>wg.conf</tt> template set the <tt>WG_CONF_TEMPLATE</tt> environment variable to a path to such file. Make sure <tt>wireguard-ui</tt> will be able to work with it - use [https://github.com/ngoduykhanh/wireguard-ui/blob/master/templates/wg.conf default template] for reference. | |||
In order to sent the wireguard configuration to clients via email, set the following environment variables:* using SendGrid API | |||
SENDGRID_API_KEY: Your sendgrid api key | |||
EMAIL_FROM_ADDRESS: the email address you registered on sendgrid | |||
EMAIL_FROM_NAME: the sender's email address* using SMTP | |||
SMTP_HOSTNAME: The SMTP ip address or hostname | |||
SMTP_PORT: the SMTP port | |||
SMTP_USERNAME: the SMTP username to authenticate | |||
SMTP_PASSWORD: the SMTP user password | |||
SMTP_AUTH_TYPE: the authentication type. Possible values: PLAIN, LOGIN, NONE | |||
EMAIL_FROM_ADDRESS: the sender's email address | |||
EMAIL_FROM_NAME: the sender's name | |||
== Auto restart WireGuard daemon == | |||
WireGuard-UI only takes care of configuration generation. You can use systemd to watch for the changes and restart the service. Following is an example: | |||
=== systemd === | |||
Create /etc/systemd/system/wgui.service | |||
[Unit] | |||
Description=Restart WireGuard | |||
After=network.target | |||
[Service] | |||
Type=oneshot | |||
ExecStart=/usr/bin/systemctl restart wg-quick@wg0.service | |||
[Install] | |||
RequiredBy=wgui.path | |||
Create /etc/systemd/system/wgui.path | |||
[Unit] | |||
Description=Watch /etc/wireguard/wg0.conf for changes | |||
[Path] | |||
PathModified=/etc/wireguard/wg0.conf | |||
[Install] | |||
WantedBy=multi-user.target | |||
Apply it | |||
systemctl enable wgui.{path,service} | |||
systemctl start wgui.{path,service} | |||
=== openrc === | |||
Create and <tt>chmod +x</tt> /usr/local/bin/wgui | |||
<nowiki>#!/bin/sh</nowiki> | |||
wg-quick down wg0 | |||
wg-quick up wg0 | |||
Create and <tt>chmod +x</tt> /etc/init.d/wgui | |||
<nowiki>#!/sbin/openrc-run</nowiki> | |||
command=/sbin/inotifyd | |||
command_args="/usr/local/bin/wgui /etc/wireguard/wg0.conf:w" | |||
pidfile=/run/${RC_SVCNAME}.pid | |||
command_background=yes | |||
Apply it | |||
rc-service wgui start | |||
rc-update add wgui default | |||
== Build == | |||
=== Build docker image === | |||
Go to the project root directory and run the following command: | |||
docker build -t wireguard-ui . | |||
=== Build binary file === | |||
Prepare the assets directory | |||
./prepare_assets.sh | |||
Then you can embed resources by generating Go source code | |||
rice embed-go | |||
go build -o wireguard-ui | |||
Or, append resources to executable as zip file | |||
go build -o wireguard-ui | |||
rice append --exec wireguard-ui | |||
== Screenshot == | |||
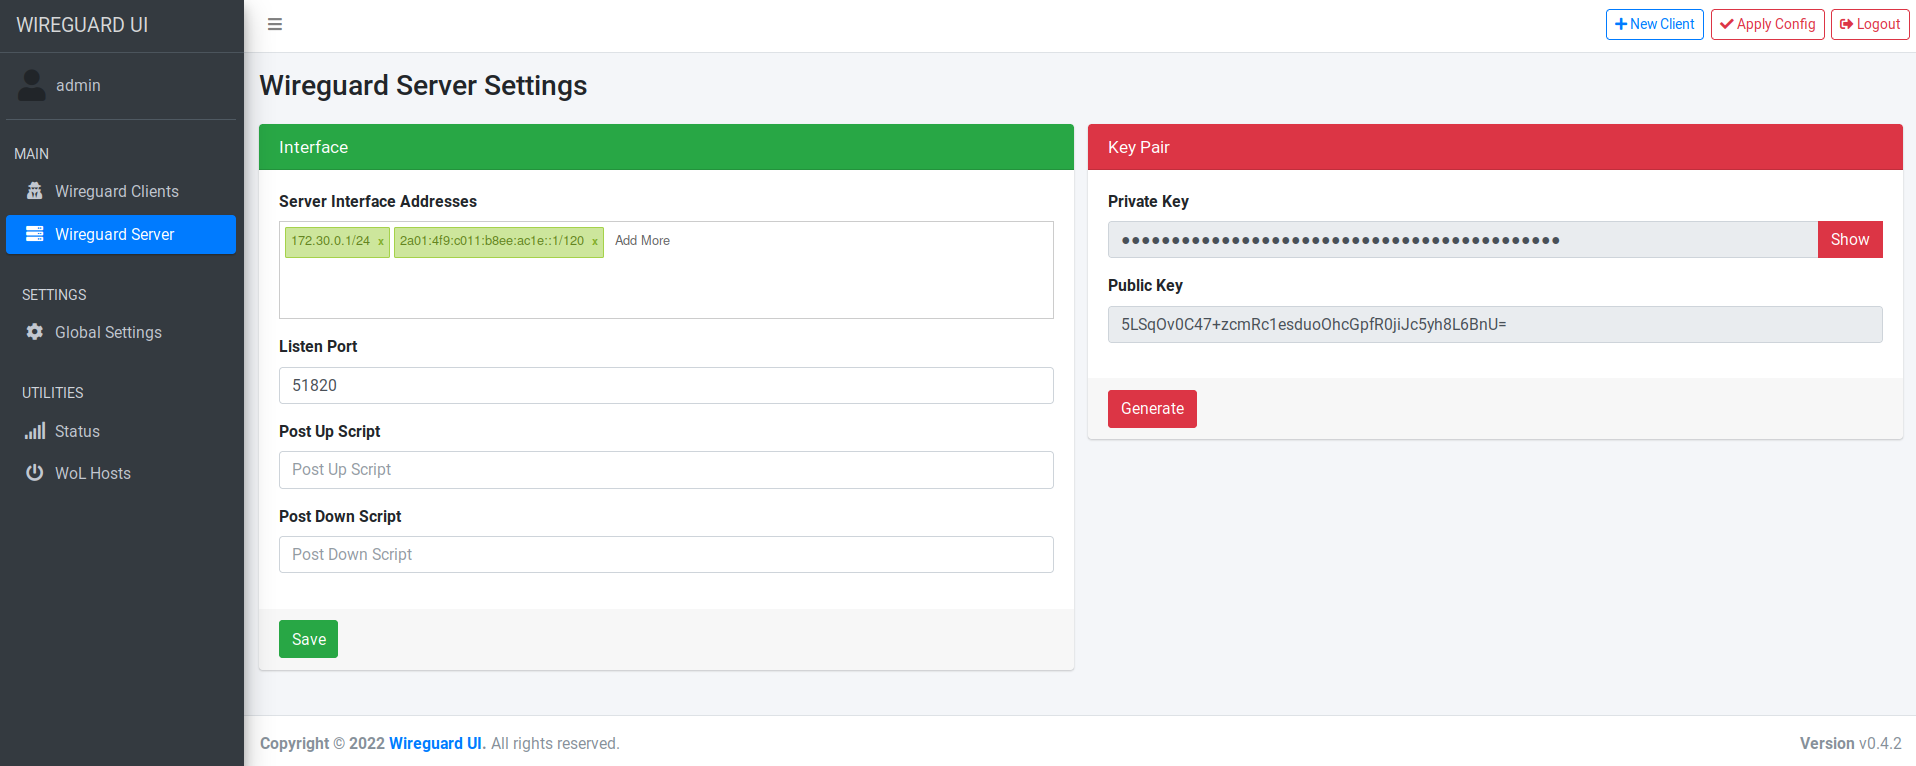
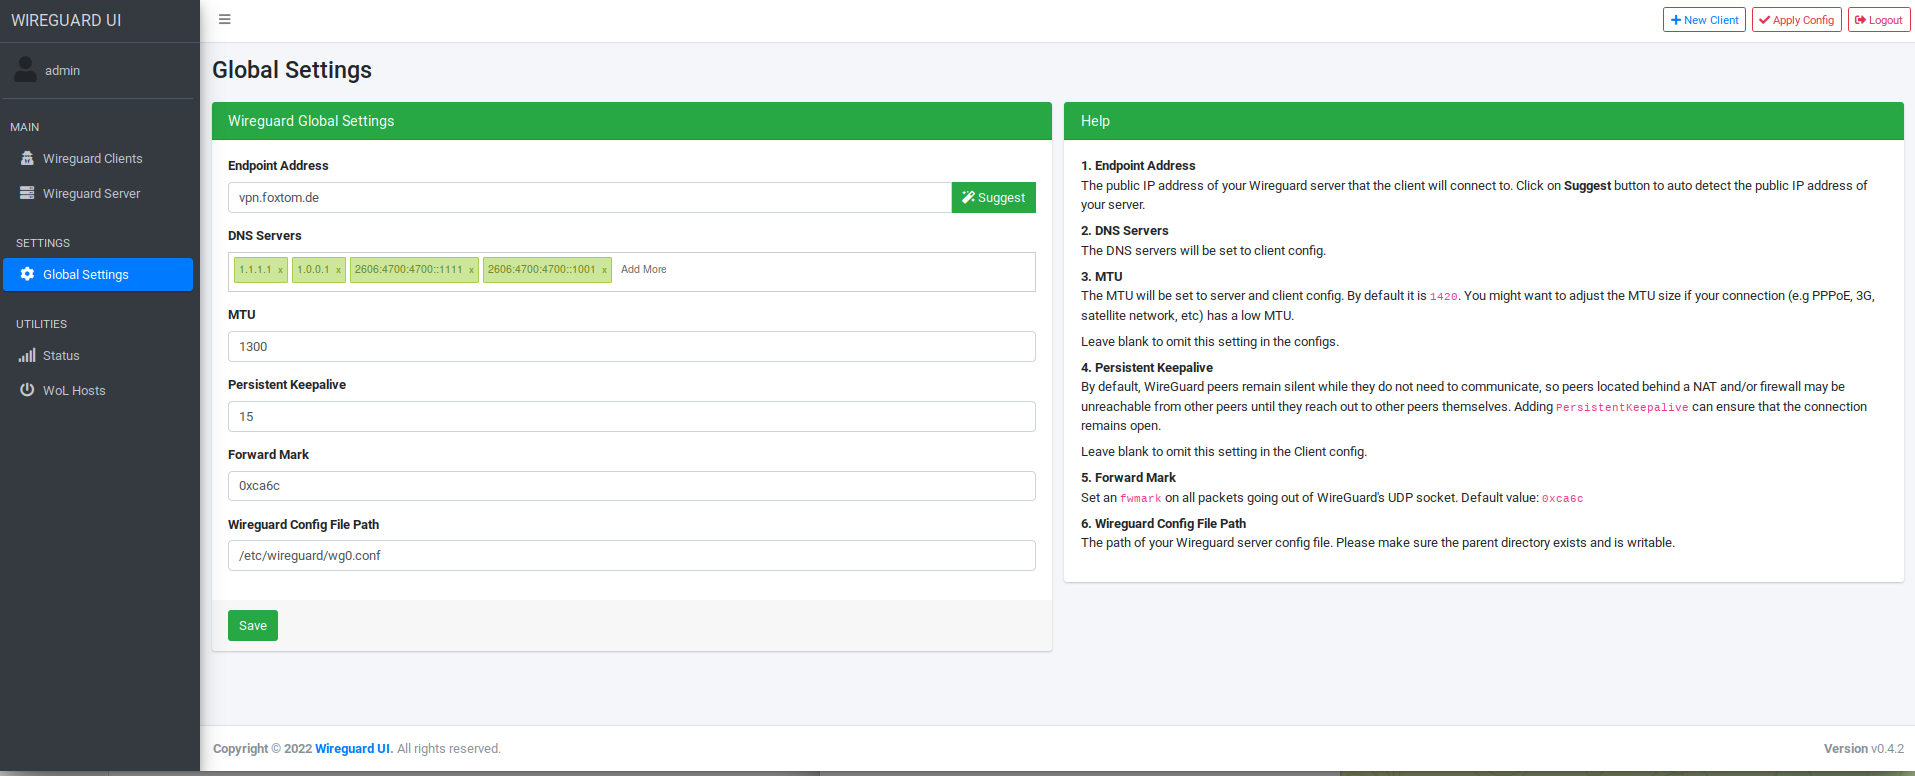
[[Image:177041280-e3e7ca16-d4cf-4e95-9920-68af15e780dd.pngBild1.png|top|alt="wireguard-ui 0.3.7"]] | |||
== License == | |||
MIT. See [https://github.com/ngoduykhanh/wireguard-ui/blob/master/LICENSE LICENSE]. | |||
== Support == | |||
If you like the project and want to support it, you can ''buy me a coffee'' [[Image:Bild2.png|top|alt="coffee"]] | |||
[[Image:Bild3.png|top|alt="Buy Me A Coffee"]] | |||
= TMP = | = TMP = | ||
| Zeile 13: | Zeile 259: | ||
[[Datei:2022-08-27 16-06.png]] | [[Datei:2022-08-27 16-06.png]] | ||
[[Kategorie:WireGuard]] | |||
Aktuelle Version vom 2. Oktober 2022, 11:01 Uhr
wireguard-ui
A web user interface to manage your WireGuard setup.
Features
- Friendly UI
- Authentication
- Manage extra client's information (name, email, etc)
- Retrieve configs using QR code / file
Run WireGuard-UI
Default username and password are admin.
Using binary file
Download the binary file from the release and run it with command:
./wireguard-ui
Using docker compose
You can take a look at this example of docker-compose.yml. Please adjust volume mount points to work with your setup. Then run it like below:
docker-compose up
Note:* There is a Status option that needs docker to be able to access the network of the host in order to read the wireguard interface stats. See the cap_add and network_mode options on the docker-compose.yaml
- Because the network_mode is set to host, we don't need to specify the exposed ports. The app will listen on port 5000 by default.
Environment Variables
| Variable | Description |
|---|---|
| SESSION_SECRET | Used to encrypt the session cookies. Set this to a random value. |
| WGUI_USERNAME | The username for the login page. (default admin) |
| WGUI_PASSWORD | The password for the user on the login page. Will be hashed automatically. (default admin) |
| WGUI_PASSWORD_HASH | The password hash for the user on the login page. (alternative to WGUI_PASSWORD) |
| WGUI_ENDPOINT_ADDRESS | The default endpoint address used in global settings. (default is your public IP address) |
| WGUI_DNS | The default DNS servers (comma-separated-list) used in the global settings. (default 1.1.1.1) |
| WGUI_MTU | The default MTU used in global settings. (default 1450) |
| WGUI_PERSISTENT_KEEPALIVE | The default persistent keepalive for WireGuard in global settings. (default 15) |
| WGUI_FORWARD_MARK | The default WireGuard forward mark. (default 0xca6c) |
| WGUI_CONFIG_FILE_PATH | The default WireGuard config file path used in global settings. (default /etc/wireguard/wg0.conf) |
| BASE_PATH | Set this variable if you run wireguard-ui under a subpath of your reverse proxy virtual host (e.g. /wireguard))
|
Defaults for server configuration
These environment variables are used to control the default server settings used when initializing the database.
| Variable | Description |
|---|---|
| WGUI_SERVER_INTERFACE_ADDRESSES | The default interface addresses (comma-separated-list) for the WireGuard server configuration. (default 10.252.1.0/24) |
| WGUI_SERVER_LISTEN_PORT | The default server listen port. (default 51820) |
| WGUI_SERVER_POST_UP_SCRIPT | The default server post-up script. |
| WGUI_SERVER_POST_DOWN_SCRIPT | The default server post-down script.
|
Defaults for new clients
These environment variables are used to set the defaults used in New Client dialog.
| Variable | Description |
|---|---|
| WGUI_DEFAULT_CLIENT_ALLOWED_IPS | Comma-separated-list of CIDRs for the Allowed IPs field. (default 0.0.0.0/0) |
| WGUI_DEFAULT_CLIENT_EXTRA_ALLOWED_IPS | Comma-separated-list of CIDRs for the Extra Allowed IPs field. (default empty) |
| WGUI_DEFAULT_CLIENT_USE_SERVER_DNS | Boolean value [0, f, F, false, False, FALSE, 1, t, T, true, True, TRUE] (default true) |
| WGUI_DEFAULT_CLIENT_ENABLE_AFTER_CREATION | Boolean value [0, f, F, false, False, FALSE, 1, t, T, true, True, TRUE] (default true)
|
Email configuration
To use custom wg.conf template set the WG_CONF_TEMPLATE environment variable to a path to such file. Make sure wireguard-ui will be able to work with it - use default template for reference.
In order to sent the wireguard configuration to clients via email, set the following environment variables:* using SendGrid API
SENDGRID_API_KEY: Your sendgrid api key EMAIL_FROM_ADDRESS: the email address you registered on sendgrid EMAIL_FROM_NAME: the sender's email address* using SMTP
SMTP_HOSTNAME: The SMTP ip address or hostname SMTP_PORT: the SMTP port SMTP_USERNAME: the SMTP username to authenticate SMTP_PASSWORD: the SMTP user password SMTP_AUTH_TYPE: the authentication type. Possible values: PLAIN, LOGIN, NONE EMAIL_FROM_ADDRESS: the sender's email address EMAIL_FROM_NAME: the sender's name
Auto restart WireGuard daemon
WireGuard-UI only takes care of configuration generation. You can use systemd to watch for the changes and restart the service. Following is an example:
systemd
Create /etc/systemd/system/wgui.service
[Unit] Description=Restart WireGuard After=network.target
[Service] Type=oneshot ExecStart=/usr/bin/systemctl restart wg-quick@wg0.service
[Install] RequiredBy=wgui.path
Create /etc/systemd/system/wgui.path
[Unit] Description=Watch /etc/wireguard/wg0.conf for changes
[Path] PathModified=/etc/wireguard/wg0.conf
[Install] WantedBy=multi-user.target
Apply it
systemctl enable wgui.{path,service} systemctl start wgui.{path,service}
openrc
Create and chmod +x /usr/local/bin/wgui
#!/bin/sh wg-quick down wg0 wg-quick up wg0
Create and chmod +x /etc/init.d/wgui
#!/sbin/openrc-run
command=/sbin/inotifyd command_args="/usr/local/bin/wgui /etc/wireguard/wg0.conf:w" pidfile=/run/${RC_SVCNAME}.pid command_background=yes
Apply it
rc-service wgui start rc-update add wgui default
Build
Build docker image
Go to the project root directory and run the following command:
docker build -t wireguard-ui .
Build binary file
Prepare the assets directory
./prepare_assets.sh
Then you can embed resources by generating Go source code
rice embed-go go build -o wireguard-ui
Or, append resources to executable as zip file
go build -o wireguard-ui rice append --exec wireguard-ui
Screenshot
License
MIT. See LICENSE.
Support
If you like the project and want to support it, you can buy me a coffee "coffee"
