Typo3/Workspaces

Aus Foxwiki

Introduction

  • Workspaces in Typo3 allow you to create new versions of the website
  • This tool is useful to create new versions before make them visible on the frontend

Create a new Workspace

  • Enter in the root page of your website and create a new Workspace
New Workspace
  • We will call it Version 3.0
  • Set all the fields according to your needs
New Workspace
  • Save>close

The workspaces

  • You can switch between the different Workspaces (Versions) clicking the Workspaces icon
Workspaces icon
  • The "Live Workspace" is the version of the website that is visible in the frontend
  • You can select the version of the website you want to work on, in our case Version 3.0
  • Once you are in the new Workspace you can add contents to the new version of the website
  • The changes you will make in the new Workspace are not visible in the frontend
Add contents to the new Version
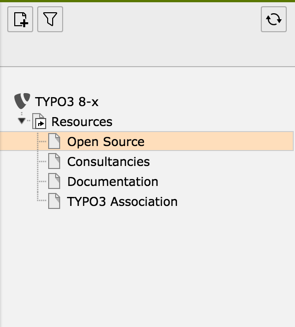
  • The sections that are being modified in the new version are highlighted in the tree section
  • Click on the View icon to check the new changes
View Icon
  • Use the tool to see the differences between the 2 pages (1)
  • If you are satisfied click on the button "Ready to publish" (2)
New version preview and "ready to publish" button

Publish the changes

  • Enter in the Workspaces module of the new Workspace
  • The highlighted pages are the ones that differ from the LIVE version of the website
New version
  • You can see the changes that have be done for every page and set their status:
  1. Editing:The changes are not ready to be published. Someone is still working on them.
  2. Send to stage Ready to publish:The editor is satisfied of his work and is waiting for an approval
  3. Publish to LIVE: The changes will be published in the live Workspace
Different stages of publication


  • This document explains how versioning and workspaces function in TYPO3 CMS and how they are set up.
  • The first part explains the technical background for administrators or developers who want to make their extensions version aware.
  • The second part is for users of workspaces, a short guide about what is possible and how to use workspaces.
  • The last part shows how to create a custom workspace.

Users Guide

  • This section covers the workspace-related features in the backend.
  • Most significantly workspaces have a selector box in the upper right corner of the backend.
The workspace selector in the top bar
  • In this selector box you can choose between the workspaces available.
  • The whole backend reloads each time one changes workspace.
  • As a visual reminder that you are currently in a workspace, a section of the top bar changes to a different color:

Activation of a workspace highlighted in the top bar As soon as you start editing inside a workspace, new versions get created for you. A page which has a change in the current workspace is highlighted in the page tree:

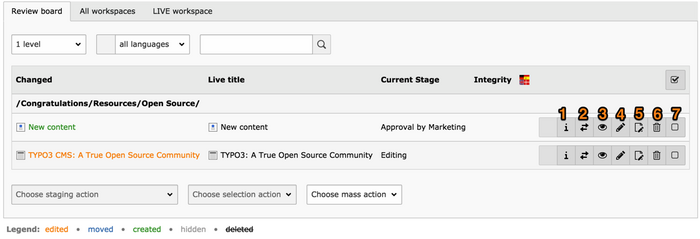
Modified page highlighted in the page tree The module WEB > Workspaces allows you to monitor changes in a workspace:

An overview of the changes in the workspaces module First of all you get an overview of all changes in the current workspace and the current page (or below, if so defined). This is also the control center for reviewing, editing and sending any change to another stage. All these operations are detailed below. The icons correspond to the following operations:# Show changes: opens the detailed view

  1. Swap: swaps the workspace and live version of that record
  2. Preview element: opens the preview window
  3. Edit element: edits the record
  4. Open version of page: switches to the WEB > Page module
  5. Discard: discards the change
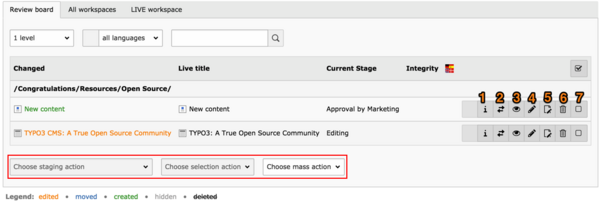
  6. selects the record. Once a records is selected, the two action menus at the bottom left become active.

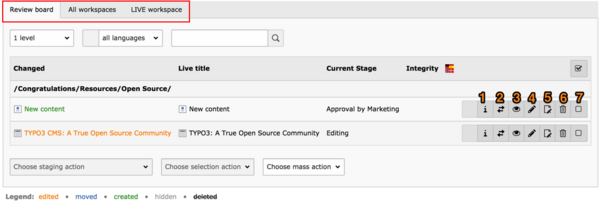
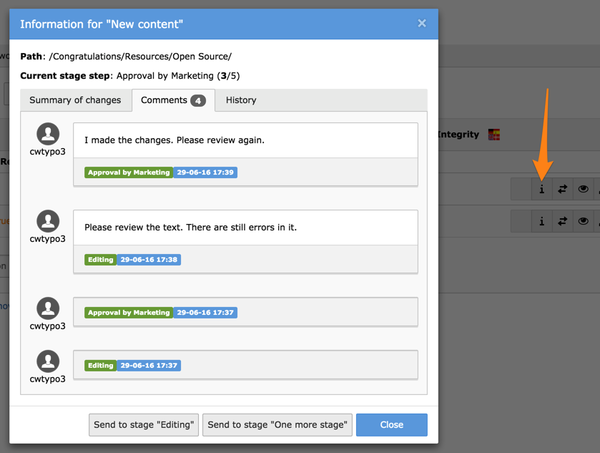
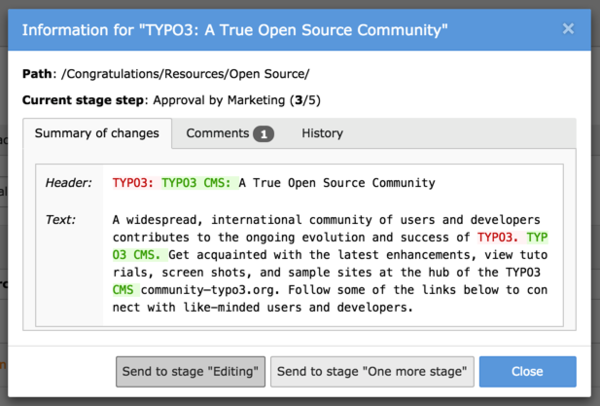
The third menu at the bottom of the view is called the “mass action” menu (detailed below). You can also switch workspace by clicking on the corresponding tab. The detailed view opens in a popup with the full history information.

Viewing all details about a change

Previewing content

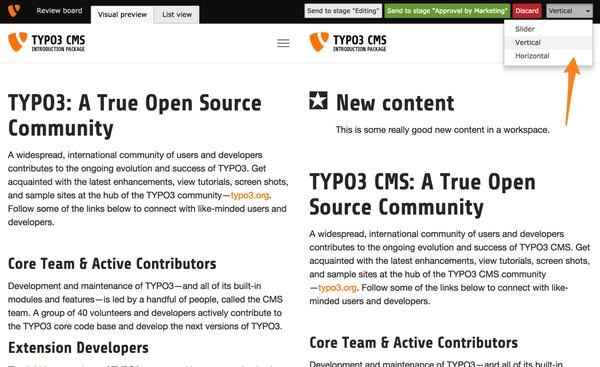
When in a workspace, as soon as you hit the “View webpage” button or use the “Save and view page” action, you will access the workspace preview. This is also possible straight from the Workspaces module, when clicking on the “Preview element” button. The workspaces preview is a simultaneous view of the live and workspace version. The default selection is to show the workspace version and to display a slider with which it is possible to change the display to the live version. With the select box in the upper right corner you can change the mode to - for example - vertical split:

Changing the workspaces split preview Clicking on the “List view” tab leads you to the same view as the Workspaces module.

Generating a preview link

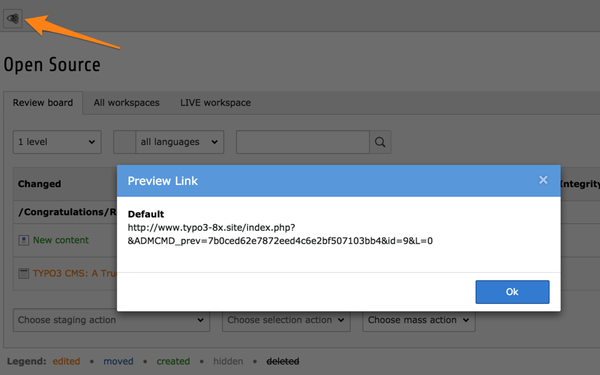
An additional feature of workspace is that a special preview link can be generated. It can be shared with anyone, even with people who have no access whatsoever to the TYPO3 CMS installation. With this link, people are able to view the page as it appears in the given workspace. Simply hit the “Generate page preview links” button in the docheader and copy the link from the popup window:

The preview link appears in a popup window

Review process

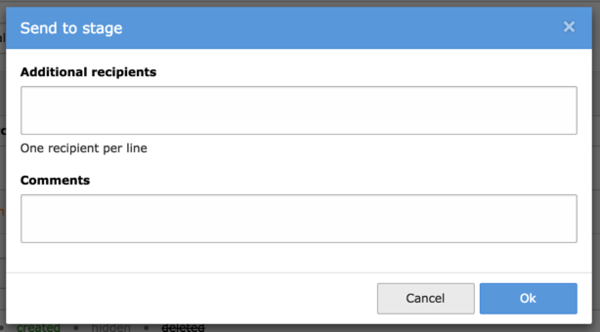
Sending a change to another stage in the review process is achieved via the detailed view popup window:

Sending a change to the previous or next stage The change can either be sent to the next stage or sent back to the previous one. Once a stage has been selected, another popup window appears for entering a message:

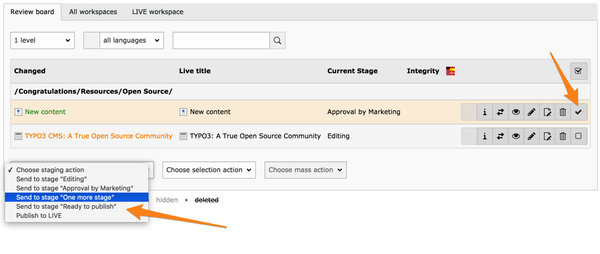
Adding a message upon sending to another stage The messages are visible as comments in the change history. Once the change reaches the “Ready to publish” stage, anyone with the proper rights can publish it to the LIVE version, upon which it is visible on the web site. Note that it is possible for anyone that is allowed to publish to directly publish from any stage. A change does therefore not necessary need to have been in all stages. It is also possible to send a change to another stage by selecting it in the overview and using the menu at the bottom left:

Sending one or more changes directly to some other stage

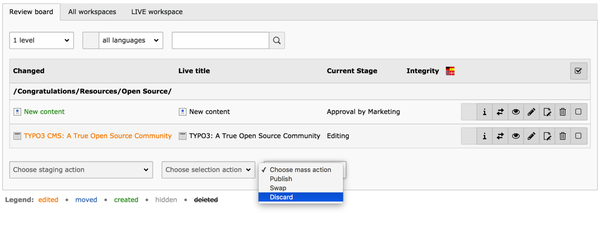
The mass action menu

  • You can also publish, swap or discard a whole workspace at once with the third menu at the bottom.
  • This select box – called “Mass Actions” - is only active when no element is selected:
Important

The mass actions affect the whole workspace, which means even the changes that may not currently be visible in the workspaces module because they are not within the currently selected branch in the page tree.

Workspace log

  • The system log will also reflect operations in the workspace.
  • In the “User” column the name of the workspace appears below the username:

Administration

Versioning

  • TYPO3 CMS offers versioning of the database elements it manages.
  • This versioning system allows you to work on future versions of content without affecting the live content.
  • It is used by workflow systems to offer a process for such content, going from creation, editing to review and publishing.
  • Versioning is available in the core API by default, but to gain access to management tools you must install the system extension “workspaces”.

Technical Details

  • Versioning must be enabled on a per-table basis in the “ctrl” section of the TCA array for the given table.
  • In addition a fixed set of fields has to exist for the management of versions.
  • All of these technical details are specified in the description of the “versioningWS” TCA property.
  • All other versioning and workspace-related properties are also described there.
  • Future and past versions of records in TYPO3 CMS remain in the same table as the live version.
  • However, all “offline” versions have a pid value of “-1” to set them apart.
  • Furthermore they have a database field called “t3ver_oid” which points to their live (“online”) counterpart.
  • When a future/past version is swapped with the live version it is done by swapping all field values except the uid and pid fields (and of course versioning related fields are manipulated according to their function). It means that online content is always identified by the same id as before and therefore all references are kept intact.
  • Versioning is easy for existing elements. However, moving, creating and deleting poses other problems. This is solved the following way:* Deleting elements is done by actually creating a new version of the element and setting a flag in the new version (t3ver_state = 2) that indicates the live element must be deleted upon publishing the versions.
  • Creating elements is done by first creating a placeholder element which is in fact live but carrying a flag (t3ver_state = 1) that makes it invisible online. Then a new version of this placeholder with the flag (t3ver_state = -1) is made which is what is modified until published.
  • Moving elements is done by first creating a placeholder element which is in fact live but carrying a flag (t3ver_state = 3) that makes it invisible online. It also has a field, “t3ver_move_id”, holding the uid of the record to move (source record). In addition, a new version of the source record is made with t3ver_state = 4 (move-to pointer). This version is necessary in order for the versioning system to have something to publish for the move operation. So in summary, two records are created for a move operation in a workspace: The placeholder (online, with t3ver_state = 3 and “t3ver_move_id” set) and a new version (t3ver_state = 4) of the online source record (the one being moved).

Unique fields

  • Unique fields like a page alias or user name are tricky in a versioning scenario because the publication process must perform a check if the field is unique in the “Live” situation. The implications of implementing this means that we have chosen a solution where unique fields are simply not swapped at all! It means that publication of a new version of a page cannot and will not alter the alias of the live version. The “Live” unique value will remain until changed in the live version.
  • You can hide fields with the “unique” keyword when there are offline versions. This is done with the display condition:
'displayCond' => 'VERSION:IS:false',

Permissions

This is an overview of how permissions are handled in relation to versioning:

Display
  • Read permissions are evaluated based on the live version of pages (as the basic rule). The read permissions of the offline page version in a workspace is not observed.
  • The ID of the live record is used so the live records display- permissions get evaluated.
Versioning records
  • To create a new version the user must have read permission to the live record he requests to version
  • A new version of a page will inherit the owner user, group and permission settings from the live record
Publishing version
  • To publish, a user must have general publishing permission in the workspace, for instance be the owner of it or have access to the Live workspace.
  • In addition, the user must have read and edit access to the offline version being published plus edit access to the live version that a publishing action will substitute!
  • The permissions of a new version of a page follows the page when published.
Editing records
  • For all editing it is required that the stage of the versioned record (or root point) allows editing.
  • Page records:
    • Permission to edit is always evaluated based on the pages own permission settings and not the live records.
  • Records from non-pages tables:
    • Always based on the live parent page.
New records
  • When new records are created with a version and live place holder the permissions depend on the live page under which the record is created.
Moving records
  • Records can be moved as long as the source and destination root point to a stage that allows it.
  • New records created with a placeholder element can be moved freely around.
  • Generally, the stage of a moved record has to allow for editing plus regular permissions for moving.
Deleting records
  • If a record supports versioning it will be marked for deletion if all usual requirements are fulfilled at the time of the delete request: delete access to record, no subpages if recursive deletion is not enabled and no disallowed table records are found. As soon as the record is marked for deletion any change to the record and subpages that would otherwise prevent deletion for the user will not be effective. The record will be deleted upon publication!
  • If you try to delete a Live record for which a version is found in the workspace, that version is deleted instead.
  • Detaching versions from a workspace and raising stage of versions can be done as long as the user has edit permission to the record.

Workspaces

  • Workspaces are the user interface that sits on top of the versioning concept, to make it easier for users to manage versions.
  • Furthermore workspaces make it possible to create a number of stages for validation of any given change, thus providing a complete review process before publication.
  • Users at all stages can be notified about changes in the review process.
  • A workspace is a state in the backend of TYPO3 CMS.
  • Basically there are two types of workspaces:
  1. LIVE workspace: this is exactly the state TYPO3 CMS has always been in. Any change you make will be instantly live. Nothing has changed, it just got a name.
    Access to the Live workspace must be explicitly granted to backend users and groups (in the “Mounts and Workspaces” tab).
  2. Custom workspaces: when users select a custom workspace new rules apply to anything they do in the backend:
  • Safety: any change they try to make will not affect the live website. It’s a safe playground.
  • Transparent versioning: they can edit pages and elements because a new version is made automatically and attached to the workspace. No training needed, no administrative overhead!
  • Previewing: visiting the frontend website will display it as it will appear when all versions in the workspace are eventually published.
  • Overview of changes: the workspace manager module gives a clear overview of all changes that have been made inside the workspace across the site. This gives unparalleled control before making the content live.
  • Constraints: only tables that support versioning can be edited.
  • Flexibility: custom workspaces can be configured with owners, members and reviewers plus database mounts and more. A custom workspace can thus offer a more targeted editing area than backend users and groups. Plus a review process as simple or complete as needed.

Publishing and swapping

  • There are two ways to publish an element in a workspace; publish or swap.
  • In both cases the draft content is published live. But when swapping it means the current live element is attached to the workspace when taken offline. *This is contrary to the publish mode which pushes the live item out of any workspace and “into the archive”.
  • The swapping mode is useful if you have a temporary campaign, say a Christmas special frontpage and website section.
  • You create the Christmas edition in a custom workspace and two weeks before Christmas you swap in the Christmas edition. All normal pages and elements that were unpublished are now in the workspace, waiting for Christmas to pass by and eventually the old frontpage etc. will be swapped back in. The Christmas edition is now back in the workspace and ready for next year.

Extensions and workspaces

Workspaces imply transparent support all over the backend and frontend and extensions must be programmed with this in mind. Although the ideal is complete transparency in backend and perfect previews in the frontend, this is almost impossible to obtain. Nevertheless a high level of consistency can be obtained by using the API provided by TYPO3 CMS. These functions and the challenges they are designed to address are discussed in TYPO3 Core API.

Create a new Workspace

  • Enter in the root page of your website and create a new Workspace
New Workspace
  • We will call it Version 3.0
  • Set all the fields according to your needs
New Workspace
  • Save>close
  • Except for the LIVE workspace (i.e. the default TYPO3 CMS working environment), some custom workspaces must be created before anyone can start using the features described in this document.
  • By default a custom workspace contains three stages, which represent steps in the validation process: “editing”, “ready to publish” and “publishing execute”. Additional stages can be added.

General

Entering the general information about the workspace As with most records in the TYPO3 CMS universe, this is just about setting a clear title and a helpful description.

Users

Setting up owners and members of the workspace This tab is about setting up user permissions. The “Owners” have all possible rights over the workspace, including publication to live. “Members” also have all the rights, although they may be prevented from publishing with the “Only workspace owner can publish” setting (see the Other tab).

Note

As usual, it is recommended to work with groups rather than individual users. “Admin” users have access to all workspaces and all operations within workspaces.

Note

Users must be given explicit access to the LIVE workspace. This is done at the level backend users or backend groups.

Giving access to the LIVE workspace to a backend group

Notification settings

Fine-grained definition for the notification process Each time a given change or set of changes moves from one stage to another (either forward or backward in the review process), people can be notified about this status change. This tab is about defining the behavior of the notification process. With “Stage change notification by email” you can choose who gets notified. This can be either all users involved in the workspace (no matter the stage) or only the users involved with the stage the changes are being sent to. Subsequently you can configure settings for the three predefined stages.

Note

The screenshot is cropped. The settings are the same for each stage. The “Settings dialog” is about the popup window which appears after each review process. If the “show dialog” box is not checked, the popup will not even appear and notifications will be sent according to the predefined settings. When the “changeable preselection” box is checked, the preselected list of users to notify can be modified on the fly before sending the change notification. The “Preselection” setting makes it possible to choose which users should be preselected by default in the notification popup. Furthermore specific users can be added to the list of notified people using the “Default notification mail recipients” field.

Mountpoints

Setting alternate mountpoint for the workspace A workspace can be restricted to one or more mountpoints. These need not be the same as the mountpoints from the users and groups that are allowed access to this workspace. If no mountpoints are defined, the mountpoints from the users and the groups they belong to are used.

Publishing

Choosing a publication date for the custom workspace If a “Publish” date is set, the content of the workspace will be automatically published on the given date. This requires the “Workspaces auto-publication” Scheduler task to be activated.

Note

Only the content which is “Ready to publish” is actually published.

Staging

Any number of custom stages can be created. Each corresponds to an additional step in the review process. Custom stages can be ordered at will. However they all come after the default “Editing” stage and before the default “Ready to publish” stage.

Setting the general information of a custom stage In the “General” tab of a custom stage, a restricted set of users can be chosen from among “Owners” and “Members”. They are called “Responsible persons”.

Defining the notification settings of a custom stage The notification settings for a custom stage are mostly the same as for the default stages, except that the “Responsible persons” can also be chosen in the predefined list of users to notify and that a “Default mail comment” can be defined for that stage.

Note

In this context “Editors” means the people that have been involved in the change originally.

Other

Miscellaneous settings for a custom workspace The “Other” tab is comprised of various settings affecting the behavior of the custom workspace. The “Freeze editing” flag actually blocks all operations in the workspace until it is turned off again. It is possible to allow editing of non-versionable records in the custom workspace. These records will be edited “live”, i.e. any changes to them performed in the workspace will be directly visible on the web site, rather than going through the review process. “Swap modes” defines if swapping should take place or not upon automatic publishing. The “Publish access” setting further refines publishing rights. If the “Publish only content in publish stage” box is checked, modified content cannot be forcefully published by workspace owners at whatever stage. It has to reach the “Ready to publish” stage. Also publication can be restricted to the owners of the workspace (i.e. members may not publish).

Configuration Options

There are a number of User TSconfig and Page TSconfig properties related to workspaces.

Note

Some of these options are actually handled by the “version” system extension, but apply to workspaces.* Page TSconfig

Page TSconfig

workspaces

splitPreviewModes

Data type

String

Description

Comma-separated list of allowed values for preview modes. Possible values are “slider”, “vbox” and “hbox”.

Example

workspaces.splitPreviewModes = slider
will restrict the preview mode to “slider”.

Default

slider, vbox, hbox

options.workspaces

previewPageId

Data type

Integer / fieldReference per table

Description

Page uid used for previewing records on a workspace.

Examples

# Using page 123 for previewing workspaces records (in general)
options.workspaces.previewPageId = 123
# Using the pid field of each record for previewing (in general)
options.workspaces.previewPageId = field:pid
# Using page 123 for previewing workspaces records (for table tx_myext_table)
options.workspaces.previewPageId.tx_myext_table = 123
# Using the pid field of each record for previewing (for table tx_myext_table)
options.workspaces.previewPageId.tx_myext_table = field:pid
enableMassActions

Data type

Boolean

Description

If set to “0”, the mass actions menu will not be available to users.

Default

1

tx_version.workspaces

stageNotificationEmail.subject

(tx_version.workspaces.stageNotificationEmail.subject) Data type

String / Localized string reference (using LLL: syntax).

Description

The default subject for the stage notification email.

The following markers can be used for replacement:* ###SITE_NAME###

  • ###SITE_URL###
  • ###WORKSPACE_TITLE###
  • ###WORKSPACE_UID###
  • ###ELEMENT_NAME###
  • ###NEXT_STAGE###
  • ###COMMENT###
  • ###USER_REALNAME###
  • ###USER_USERNAME###
  • ###RECORD_PATH###
  • ###RECORD_TITLE###

Default

LLL:EXT:version/Resources/Private/Language/emails.xml:subject
stageNotificationEmail.message

(tx_version.workspaces.stageNotificationEmail.message) Data type

String / Localized string reference (using LLL: syntax).

Description

The default message for the stage notification email. The same markers are available as for the subject (see above).

Default

LLL:EXT:version/Resources/Private/Language/emails.xml:message

User TSconfig

options.workspaces

previewLinkTTLHours

Data type

Integer

Description

Number of hours until expiry of preview links to workspaces.

Default

48
swapMode

Data type

String

Description

Possible values are:

“any” - if page or element (meaning any record on the page) is published, all content elements on the page and page itself will be published regardless of the current editing stage.

“page” - if page is published, all content elements on the page will be published as well. If element is published, its publishing does not affect other elements or page.
changeStageMode

Data type

String

Description

Possible values are:

“any” - if page or element (meaning any record on the page) stage is changed (for example, from “editing” to “review”), all content elements on the page and page will change to that new stage as well (possibly bypassing intermediate stages).

“page” - if page stage is changed (for example, from “editing” to “review”), all content elements on the page will change stage as well (possibly bypassing intermediate stages). If stage is changed for element, all other elements on the page and page itself remain in the previous stage.
allowed_languages
Property
workspaces.allowed_languages.[workspaceId]

Data type

(list of sys_language ids)

Description

This is a list of sys_language uids which will be allowed in a workspace. This list - if set - will override the allowed languages list in the BE user group configuration.

Example

options.workspaces.allowed_languages.3 = 1,2
In this example, the user will be restricted to languages with “uid” 1 or 2 in the workspace with “uid” 3.

Scheduler tasks

The “workspaces” extension provides two Scheduler tasks. Workspaces auto-publication

This task checks if any workspace has a scheduled publishing date. If yes and if that date is passed, then all changes that have reached the “Ready to publish” stage are published to the Live workspace.

Workspaces cleanup preview links

When preview links are generated, they are stored in the database (in table “sys_preview”). This task will delete any link which has expired.