Typo3/Forms: Unterschied zwischen den Versionen
Erscheinungsbild
K Dirkwagner verschob die Seite Typo3:Forms nach Typo3/Forms, ohne dabei eine Weiterleitung anzulegen: Textersetzung - „:“ durch „/“ |
|||
| (12 dazwischenliegende Versionen von 2 Benutzern werden nicht angezeigt) | |||
| Zeile 14: | Zeile 14: | ||
[[Datei:Schermata 2021-02-26 alle 11.41.23.png|mini|ohne|Form edit]] | [[Datei:Schermata 2021-02-26 alle 11.41.23.png|mini|ohne|Form edit]] | ||
*Remember to give a name to the steps you are creating | *Remember to give a name to the steps you are creating | ||
[[Datei: | [[Datei:Name.png|mini|ohne|Step name]] | ||
*When you add new contents to the step you are working on you can edit the fields in section (1) | *When you add new contents to the step you are working on you can edit the fields in section (1) | ||
*You can add further information and settings in section (2) | *You can add further information and settings in section (2) | ||
| Zeile 21: | Zeile 21: | ||
*You can add as many steps as you need (1) and customize them to make them useful to your purposes (2) | *You can add as many steps as you need (1) and customize them to make them useful to your purposes (2) | ||
[[Datei:Schermata 2021-02-26 alle 12.07.04.png|mini|ohne|Add more steps]] | [[Datei:Schermata 2021-02-26 alle 12.07.04.png|mini|ohne|Add more steps]] | ||
==Summary== | ==Summary== | ||
*When you think that your form is complete you can add a summary step at the end to make possible to the viewer to have a last view of the fields he/she inserted before the submission | *When you think that your form is complete you can add a summary step at the end to make possible to the viewer to have a last view of the fields he/she inserted before the submission | ||
[[Datei:Schermata 2021-02-26 alle 12.09.43.png|mini|none|]] | [[Datei:Schermata 2021-02-26 alle 12.09.43.png|mini|none|]] | ||
==Finisher== | ==Finisher== | ||
*In the first section of the form (1) you can add a Finisher to your form (2) | *In the first section of the form (1) you can add a Finisher to your form (2) | ||
*The finisher is an action that will be done after that the Website viewer will submit the form. You can choose between the option you see below | *The finisher is an action that will be done after that the Website viewer will submit the form. You can choose between the option you see below | ||
[[Datei:Schermata 2021-02-26 alle 12.12.25.png|mini|ohne|Finisher]] | [[Datei:Schermata 2021-02-26 alle 12.12.25.png|mini|ohne|Finisher]] | ||
Save>Close | |||
=Insert the form in a website page= | |||
*Now that your form is ready you just have to add it to one of the pages of the website | |||
*To do so open the Page module (1) | |||
*Select the page in which you want to add the form from the page tree (2) | |||
*Select in which part of the page you want to add your form (3) | |||
[[Datei:Schermata 2021-02-26 alle 12.28.47.png|mini|ohne|Add the form to a page]] | |||
*Select the form element section between the available contents(1) | |||
*Click of form (2) | |||
[[Datei:Schermata 2021-02-26 alle 12.31.56.png|mini|ohne|Upload form]] | |||
*Enter in the plugin section (1) | |||
*Select your form (2) | |||
[[Datei:Schermata 2021-02-26 alle 12.34.16.png|mini|ohne|Choose the form you want to add to the page]] | |||
Save>Close | |||
[[Kategorie:Typo3]] | |||
Aktuelle Version vom 29. März 2023, 12:23 Uhr
Introduction
- In your website you can create and insert flexible and customizable forms
Generate your form
- First of all you have to create the form that fits better with your needs
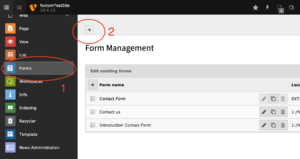
- To do that enter in the Form module (1) and click on new form button (2)
- It is suggested to create a Blank form, in this case you are more free to adapt the form to your needs
- Insert the name for the form and click on Finish
Edit Your form
Steps
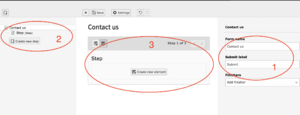
- Edit the name and the submit label of your form (1)
- In section number (2) you can add new steps to your form and choose which step you want to work on
- In section number (3) you can edit the step adding new fields and choose between a list of available contents
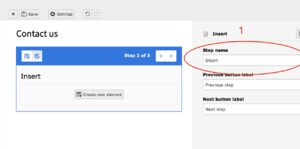
- Remember to give a name to the steps you are creating
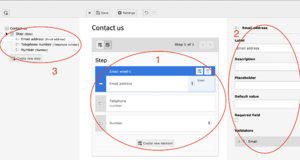
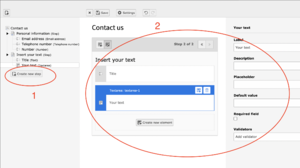
- When you add new contents to the step you are working on you can edit the fields in section (1)
- You can add further information and settings in section (2)
- You can see the updated structure of the form in section (3)
- You can add as many steps as you need (1) and customize them to make them useful to your purposes (2)
Summary
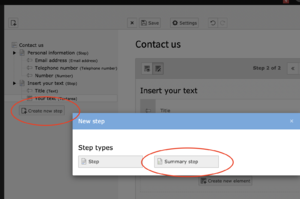
- When you think that your form is complete you can add a summary step at the end to make possible to the viewer to have a last view of the fields he/she inserted before the submission
Finisher
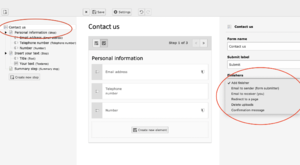
- In the first section of the form (1) you can add a Finisher to your form (2)
- The finisher is an action that will be done after that the Website viewer will submit the form. You can choose between the option you see below
Save>Close
Insert the form in a website page
- Now that your form is ready you just have to add it to one of the pages of the website
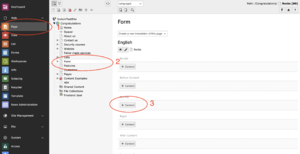
- To do so open the Page module (1)
- Select the page in which you want to add the form from the page tree (2)
- Select in which part of the page you want to add your form (3)
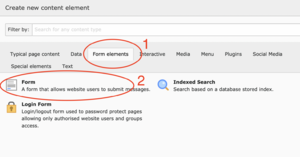
- Select the form element section between the available contents(1)
- Click of form (2)
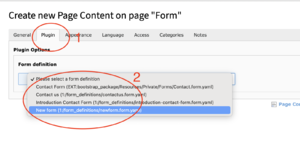
- Enter in the plugin section (1)
- Select your form (2)
Save>Close